Using node-mongodb-native with express.js


I looked everywhere to find a good way to use node-mongodb-native with express.js and nothing looked right. I think its because everybody is using mongoose or mongoskin.

In node-mongodb-native, to get a database handle you want to use MongoClient.connect like this

MongoClient.connect(url, function(err, db) {

 // so here you have the db handle, now what?

});

I’ve seen some suggestions like this in app.js

MongoClient.connect(url, function(err, db) {
  app.set('db', db)
});

And now the handle is available in the routes like this

router.get('/', function(req, res, next) {

  var db = req.app.get('db');

});

But there’s a problem and you might never notice. MongoClient.connect is async. You have no idea that it will finish and assign db before the route gets called. In a live website this might never be a problem, but what if you use this code in testing where MongoClient.connect is called just milliseconds before router.get but the MongoClient.connect callback is called a few seconds after MongoClent.connect?

My Solution

MongoClient.connect(url, function(err, db) {
  app.set('db', db)
  // start express server here!
});

How is this possible without making a mess to the existing express.js code structure?

Its not that bad actually. First you have to take a sharp scalpel to the startup script bin/www

Change this

server.listen( port ); 
server.on( 'error', onError ); 
server.on( 'listening', onListening );  

To this ( simply add three lines )

require( '../lib/mongo_init' )( function( db ) {
  app.set( 'db', db );
  server.listen( port );
  server.on( 'error', onError );
  server.on( 'listening', onListening );
} )

And now create this file in lib/mongo_init.js. Please excuse all the bluebird and env stuff, its already been tested so I just copied it to here.

var MongoDB = require('mongodb');
var MongoClient = MongoDB.MongoClient;
require('bluebird').promisifyAll(MongoDB);
require('bluebird').promisifyAll(MongoClient);

module.exports = function(callback) {

  var env = process.env.NODE_ENV || 'development'; 
  var url = [ 'mongodb://localhost:27017', '/', 'tutorial', '-', env ].join( '' ); 

  console.log('mongo_init using ' + url )

  MongoClient.connectAsync( url ).then( function( db ) {   
    callback(db);  
  } );

}    

I took a shot at simplifying the above code but its untested.

module.exports = function(callback) {

  var url = 'mongodb://localhost:27017';
  MongoClient.connect( url , function( err, db ) {   
    callback(db); 
  } );

}

Testing scenario

This is how I’d use mongo_init with supertest and mocha.  (Note how done() is used to put the breaks on mongo_init before the unit test is run ( express.js doesn’t offer the done() because its just a kludge that uses setTimeout to force before() to take up to 2 seconds or until done() is called, I suppose this could have been used in express.js to some success)

var assert = require('chai').assert, 
var supertest = require('supertest'),
var mongo_init = require('../lib/mongo_init'), 
var app = require('../app')  

before( function( done ) {

  mongo_init(function(db){
    app.set('db', db);
    done();
  });

} );

test( 'super', function(done) {

  supertest( app )
  .get( '/api/shigoto' )
  .expect( 200 )
  .end( function( err, res ) {
    if ( err ) throw err;
      assert.equal('work', res.body.definition)
      done();
    } );

})
Advertisement

Backstack rails plugin and algorithm

Inception:

A few years ago I built a web app that had an unusual, if not suspect, UX feature. It seemed like the right way to go at the time, and I think it actually turned out well. Its been in production for a few years and has only had a few usability issues which I’ll discuss below.

Requirements:

The user should be able to search on things, drill down, perform
various CRUD actions, and then click a series of back-links, or a
breadcrumb trail, to return to the search results. Actually, that’s a simplification of the possible users interactions – it could get very elaborate.

Problem already solved?

This might seem like a simple problem to solve. Just somehow remember where the user just was, hardcode the back-links, or use something like javascript history.go(). But those wouldn’t work because the user might have to go back through various CRUD operations, success and failure screens, and probably would eventually end up in an embarrassing back-link loop.

But OMG is that RESTful?!?

Some data is stored in the session – but does that mean its not RESTful? I’m not sure and I’m also not that concerned. REST advocates are like libertarians; they have good ideas, but they usually take those ideas too far, and probably don’t practice what they preach anyway.

How about sessions that store authentication information? Are they RESTful? If that’s all they are doing, then yes they are. However, if along with that authentication information, additional information is used to differentiate, by user, what looks like the same resource , then I think the RESTful purity is out the window – and this is a practice for almost all web apps, including those built by REST evangelists.

But is a back-link or breadcrumb trail even a part of the resource at all, or just considered part of the interface?

So then how?

So how to make a back-link do the right thing? Is there a pattern it could follow to figure out what “back” always correctly meant? Turns out it depends on the structure of your web app.

Wrong structure for backstack

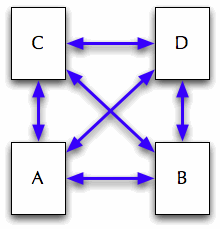
If your web app’s structure looks like the image below (what nerds would call a complete graph), with squares being web pages and lines being links, then I don’t think there would be much hope because the user would eventually find themselves in a back-link loop, and the concept of back wouldn’t mean that much anyway.
Right structure for backstack

If your web app’s graph follows the characteristics listed below (or a targeted subset of your web app), and I believe most do, then the backstack’s algorithm works well. I don’t have a formal proof of this, which is preferable since I’d just screw it up, or get bored and never finish.

  • Its graph is “layered”.
  • Links don’t jump layers, they can only travel one layer at a time
  • Free travel is allowed within a layer, so a layer itself could be considered a complete graph.

Below is an idealized web app’s graph exemplifying of the rules listed above.

You can think of page A as my old web app’s search results page, B and C are the landing pages for those “things” that I searched on, and D, E, and F are various screens for B and C.

If the user drills down from A, through B to D, backstack
has to build links that know to go back to B and not to C, and then back to the results page of A.

The way backstack works is it builds up a “stack” (you didn’t see that one coming?), using what it knows about your web apps “graph”, and uses that stack to figure out the way back.

Describing the graph to backstack

Before we get to the stack building algorithm, how does backstack know the graph of your web app?

In my old site, where backstack was born, the graph description is an ugly, hard to follow mess in application_controller.rb. But because I made this into a rails plugin I had higher standards to meet.

You simply tell backstack which actions potentially back-link to which other actions. In the below image, the red arrows is all backstack needs to know.
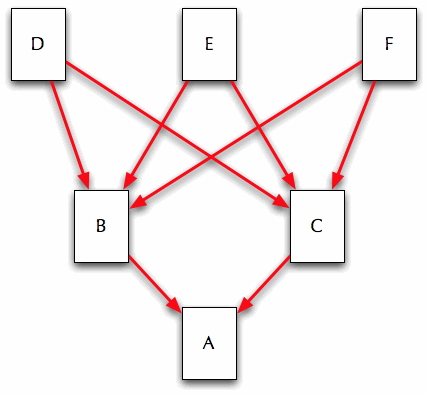
Lets say that each row of the graph is handled by a single controller. A is the only action in the c1 controller, B and C are in the c2 controller, and D, E, F are in the c3 controller.

Tell backstack that B and C back-link to A. Because A is in in another controller, we need to be more specific using ‘railsy’ looking # notation


class C2Controller  "c1#a"

  backstack :c => "c1#a"

  def b; end
  def c; end

end

You could call backstack multiple times, but there’s an array shorthand that lets you group actions together. The follow backstack call says “actions d, e and f in the current controller go back to b and c in controller c2.”

class C3Controller  ["c2#b", "c2#c"]

  def d; end
  def e; end
  def f; end

end

Those three calls to backstack are all we need to describe the above graph of the website to backstack.

The stack and its algorithm

Using this graph information backstack dynamically builds a stack to keep track of ‘back’. It uses these following rules to do it.

Stack elements are the array [action, fullpath, label], fullpath is the actual URL, a.k.a. request.fullpath, label is for breadcrumb text.

  • Start rule – If stack is empty push current page on stack
  • Stacking rule – If current page back-links to what’s already at top of stack then push current page on stack, building up stack.
  • Rewind rule – If current page is already on stack, rewind past it, and push current (rewind and push because fullpath might have changed). This could possibly shrink stack (certainly if user clicked on a breadcrumb link)
  • Sidestep rule – If current page doesn’t close to top of stack, replace top of stack with current page. (like B to C and D to E to F)

anim1

The simple back link

  <%= backstack_link "Back" %>

The breadcrumb trail

If you want to use backstack to create breadcrumb trails you need to pass it crumb labels. Just wrap the actions, along with their labels, in a hash. Only label the actions in the current controller, not the actions they back-link to. Also keep in mind that ruby can get a little confused about method parameters when they get complicated, so make sure you enclose them in parentheses.

class C1Controller  "Alpha"} => nil)

  def a; end

end

class C2Controller  "Bravo"}, {:c => "Charlie"}] => "c1#a"

  def b; end
  def c; end

end

class C3Controller  "Delta"},
             {:e => "Echo"},
             {:f => "Foxtrot"}] => ["c2#b", "c2#c"])

  def d; end
  def e; end
  def f; end

end

Backstack supports breadcrumb trails with the method backstack_trail().

It becomes an iterator if passed a block:

<% backstack_trail do |c| %>
  <% if c[:fullpath] == request.fullpath %>
    <%= c[:label] %>/
  <% else %> <%# make clicky %>
    <%= link_to(c[:label], c[:fullpath]) %>/
  <% end %>
<% end %>

A call to backstack_trail() without a block returns an array to make it easier to join your breadcrumbs. (Don’t have to deal with anoying newlines and a trailing separator like the above example.)

<% crumbs = backstack_trail.map do |c|
     if c[:fullpath] == request.fullpath
       c[:label]
     else
       link_to(c[:label], c[:fullpath])
     end
end %>
<%= crumbs.join("/").html_safe %>

Usability Issues

Having a back-link that just does the right thing has only confused a few users as far as I could tell from feedback. I suspect those users were more familiar with how websites normally behave and were a little thrown off. Others were probably confused that there was a difference between a back link and the browsers back button. I think both of these difficulties can be remedied by using a breadcrumb in place of, or along with, the back-links.

Diagnostics

If things get hinky you can dump diagnostic info to your log file with backstack_dump()

class ApplicationController < ActionController::Base

  after_filter :backstack_dump

end

Get and use backstack

Find the source here:
https://github.com/kswope/backstack

Find the gem here:
https://rubygems.org/gems/backstack

Install the gem like so:

gem install backstack

Unsurprisingly you need this line in your Gemfile:

gem 'backstack'

pparams rails plugin

I’ve reached a new low in trivial rails plugins.

github.com/kswope/pparams

Betting on rails never calling, and any rails programmer never needing, the Kernel.p method, this plugin overwrites it by aliasing params to p.

Instead of

  user = User.find_by_email( params[:email] )

you can use

  user = User.find_by_email( p[:email] )

Sounds silly but I find that code that calls params, sometimes multiple times in one line, tends to break across lines, and I don’t like that.

pparams might make this less likely to happen.

Install it like this, (but you already knew that)

sudo gem install pparams

Don’t forget to restart your rails server or things get weird. Hopefully this wont break anything, but if it does let me know. Breakage would probably be immediately apparent, like logging suddenly stops working.

clog, colorful Ruby on Rails debug statements

I’m publishing yet another puny Ruby on Rails plugin.

http://github.com/kswope/clog

clog == “color log”

This blog post is mostly a repeat of the gem’s rdoc but with dazzling color pictures!

Gemfile

  gem "clog"

You change the defaults in environment.rb just like rails 2x but without the require.

Flag

No arguments outputs a “flag” to the log

clog

Single argument

  clog var

Tagged argument

First argument must be a symbol, which outputs before second argument.

  clog :var, var

Multiple arguments

Will output each on its own line.

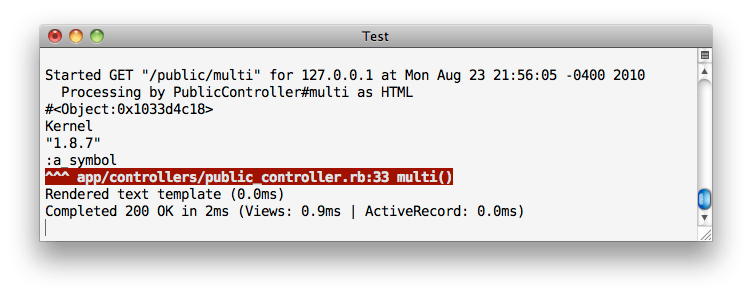
  clog Object.new, Kernel, RUBY_VERSION, :a_symbol

Changing color

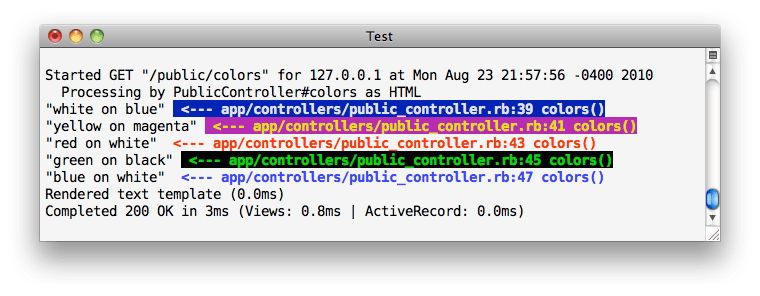
Clog.colors(background, forground=white)

Choices- :black, :red, :green, :yellow, :blue, :magenta, :cyan, :white

  Clog.colors(:blue)
  Clog.colors(:black, yellow)

Default is red background, white foreground.

Max width

clog figures out when its appropriate to place additional information (line number, calling method, etc) on the right of the output or below it on the next line. Think of maxwidth as representing the width of your terminal window. The default is 150

  Clog.maxwidth(100)

Handmade Rails Authentication

Update: As of rails4 I still find the below mentioned session_countdown useful, but auto_hash has been replace with the rails native has_secure_password

Although there is an abundance of rails authentication/login plugins (Clearance, Devise/Warden, Authlogic, Simplest Auth, Restful Authentication, etc) I still find myself unsatisfied and therefore creating custom systems. If the abundance of authentication plugins hints at anything, it’s that many others feel the same way.

I have many reasons/rationalizations for wanting to do this. I often find these existing plugins to be too invasive; involving themselves in models, controllers, tasks, mailers, and I can’t imagine what else.

I also often find myself with unique authentication requirements, such as needing both a normal login form as well as a AJAX type interface, in the same application. Even situations where the password is optional.

I’m sure many of the existing authentication plugins can do many things when pushed, but then I find myself trying to bend opinionated software to my will, which honestly, I’ve had my fill of, being a rails developer.

Handmade authentication is not that difficult, and with the few simple plugins that I’ve created, its almost trivial. Below I show how to build an authentication system in rails 3.x with my new gems session_countdown and auto_hash.

I’m going to comment the code below with “SC” and “AH” to make it easy to spot where these two plugins are used.

You can view the docs and source for these gems at github:

http://github.com/kswope/session_countdown

http://github.com/kswope/auto_hash

Below are the steps to create a Ruby on Rails 3.x application that demonstrates how to use these plugins to create an authenticated website.

Lets get started


rails new handmade_authentication_demo

In Gemfile

gem "auto_hash"
gem "session_countdown"

Install the gems

bundle install

Generate the user model

shell> rails generate model user

In db/migrate/*_create_users.rb

class CreateUsers < ActiveRecord::Migration

  def self.up
    create_table :users do |t|
      t.string :email
      t.string :password
      t.timestamps
    end
  end

  def self.down
    drop_table :users
  end
end

In app/models/user.rb ( this is one of auto_hash’s only two appearances, the other being password_hash_match?() )

class User < ActiveRecord::Base

  auto_hash :password # AH

end
rake db:migrate

Create a new user from the console (don’t use seeds.rb, doesn’t run model hooks)

irb> u = User.new
irb> u.email = "adrian@example.com"
irb> u.password = "RamessesII"
irb> u.save


In config/routes.rb


root :to => "public#index"

match "login_screen",
      :to => "public#login_screen",
      :as => "login_screen"

match "login",
      :to => "public#login",
      :as => "login"

match "logout",
      :to => "public#logout",
      :as => "logout"

match "count",
      :to => "public#count",
      :as => "count"


Don’t forget to delete index.html, as I’m sure everybody does.

shell> rm public/index.html


We are just going use one controller for this simple demo:

shell> rails generate controller public

Add this code to  app/controllers/public_controller.rb


  skip_before_filter :authorize, :except => [:index]

  def login

    user = User.find_by_email params[:email]

    if user && user.password == params[:password] # AH
      session.countdown_start(1.minute) # SC
      flash[:notice] = "Success logging in"
      redirect_to session[:original_uri] || :root
    else
      flash[:notice] = "Email/Password wrong"
      render :login_screen
    end

  end

  def logout
    session.countdown_abort # SC
    flash[:notice] = "Logged out"
    redirect_to :login_screen
  end

  def count
    render :text => session.countdown_count.to_i # SC
  end


Here is app/controllers/application_controller.rb. This is what puts your application behind an authentication wall


  before_filter :authorize

  def authorize

    if session.countdown_running? # SC
      session.countdown_restart # SC
    else
      session[:original_uri] = request.fullpath
      if session.countdown_expired? # SC
        flash[:notice] = "Login Expired"
      else
        flash[:notice] = "Please login"
      end
      redirect_to :login_screen
    end
  end


Login page app/views/public/login_screen.html.erb


<p><%= flash[:notice] %></p>

<%= form_tag(:login) do %>
  <%= text_field_tag(:email, params[:email]) %>
  <%= password_field_tag(:password) %>
  <%= submit_tag("Log In") %>
<% end %>

Your index page (what’s behind the auth wall) app/views/public/index.html.erb. There’s an AJAX updater to show a countdown, demoing countdown_count().


<p><%= flash[:notice] %></p>

<span id="count"></span> seconds until login expires - refresh to "restart" countdown before it expires, or <%= link_to("logout", :logout) %>

<script type="text/javascript">
  new Ajax.PeriodicalUpdater('count', '/count', {
    frequency: 1, decay: 1
  });
</script>


Adding a “Remember me” feature

If you want an “remember me” feature you need to do two things.

1. Set timer for far future when user checks “remember me”

session.countdown_start(1.year)

2. Tell rails to serve up a persistent cookie instead of session cookie:

In rails 3x, in config/initializers/session_store.rb

ActionController::Base.session = { :expire_after => 1.year }

In rails 2x, probably in app/controllers/application_controller.rb

ActionController::Base.session_options[:expire_after] = 1.year

Persistent vs session cookies explained

There are two types of browser cookies: ones with expiration dates and ones without. When a cookie doesnt have an expiration date it’s a session cookie and will be deleted when the browser quits. If the cookie has an expiration date it’s a persistent cookie (a.k.a. domain cookie) and will be valid until that date.

“Remember me” could work fine with only session cookies, provided the user never quits the browser, but users expect “remember me” to never expire their login and to persist across browser quits. It also makes sense to set a far future expiration date or the cookie will eventually expire before the login does.